
Do you ever have last minute creative inspiration? It comes at a really inopportune time, can't be ignored and usually has a high pressure deadline. This happens to me all. the. time. I have had a stack of little golden book covers that I've been trying to find a use for. The pages were used to make roses for Cystic Fibrosis' 65 Roses Day (you can read more here).

I was thinking of all the travel memorabilia I have shoved in boxes and bags (big fat hoarder remember) and how soon my friends would be travelling to Queensland as part of the Make a Wish program. Their daughters wish to meet a dingo had been granted so the whole family were going to Australia Zoo and would then be spending a week in Queensland hitting up the themeparks etc. What an amazing trip, right? And what a bunch of precious memories were going to be made. This inspired me to create something for the girls to record all the amazing moments in, that included lots of little places to store treasures and tickets. Something they could both look back on and remember this trip.
The Little Golden Book covers were the starting point of my travel journals. The deadline was pretty tight - I was struck by inspiration Thursday afternoon and they were flying out Saturday afternoon. Throw in some computer issues and a needy baby and things got interesting! I finished them, quickly snapped some photos , spent a frantic 10 minutes hunting for my keys (which I had with great foresight already placed in my bag) before rushing out the door with fingers crossed we would get there in time!
Below I've listed the supplies and steps I used to create my Little Golden Book travel journals. I think they would also make cute adults travel journals - just leave out the activities..... maybe throw in some sudoko for those long flights!

Supplies:
Sharp craft knife (Stanley knife), stickers, markers and other embelishments, glue stick, double sided tape, photo album screws (aka brass binder screw set-photo below), Little Golden Book (I thrifted mine) , coloured and white paper for printing and scrapbooking paper to make pockets etc. Finally a selection of snacks. I have found that one can not study or create without a range of tasty little snacklets. On this occasion I covered all the major food groups - Savory (Pringles), Sweet (chocolate covered liquorice and a block of Snack) and Gelantinous (Party Mix).
I just want to make clear right from the start that I am not a scrap booker or a graphic design artist! So some of you may know better ways to do things (Please Share!!) and others will be able to create much more awesome page layouts then I did. If you do make a Little Golden Book travel journal make sure you share! I'd love to see it!!

Run a Stanley knife down the side of the golden binding. Seperate the back cover from the front by locating the staples under the golden binding tape (they're pretty easy to feel). Make a small slit in the binding tape where you feel the staple on the front and back covers. At the back - lift the staple "legs" straight (circled in the second picture) and pull the back cover away from the front. Then push the staple "legs" against a hard surface so that they push out of the front cover. Your covers should now be separated and staple-less.

Punch holes for the photo album screws were the staples used to be (excuse my dodgy Iphone pic-tight deadline remember). I also punched a hole in the back cover for a ribbon book mark. I used a hole punch, which was not ideal. My first book is really wonky. I thought next time I might use a drill or a punch and hammer. If there are any paper crafters who have a better idea how to do this I'd love to hear them!

I then wrote the girls names on their journal using a paint pen and stickers. I just used what I had on hand.


I used publisher to design the pages of my journals. I made pages to write what they did each day, funny moments, their favourite things, what they bought etc. I also designed some activities. I've included these as a free printable above-just click on the image. If you'd like my original files so you can see all of the pages, or because you want to change colours just shoot me an email.
I also included lots of activities so that they would have something to do when on the place or waiting for connecting flights. You can find lots of free colouring pages and activities here, here, here and here. I printed off some of these journalling pages from here on coloured paper so the girls had lots of room to write about their holiday.
To cut the pages down to size I used the front cover as a guide for my Stanley knife. I then traced the position of the holes from the front cover to a piece of paper. In order to make sure I'm not about to punch a hole to close to the edge I usually line up my hole punch, squeeze gently being sure not to actually punch through. This way I can move the hole punch and make sure its positioned well - do this! Trust me! Also don't punch to many pages at once, the bottom pages tend to shift, again trust me!!

Next put the pages in the order you want, place them between the covers and add your photo album screws.

Then you can complete it however you like - I went through and glued in the journalling pages, added lots of pockets using scrap paper and double sided tape for all their little mementos. I left some pages blank so they could exercise their own creativity and on other pages put stickers that may guide their writing or drawing. All of my pages had one blank side. This is because A. I couldn't be bothered faffing around and figuring out double sided printing and B. The papers thin enough so that you would see the other side from the front.
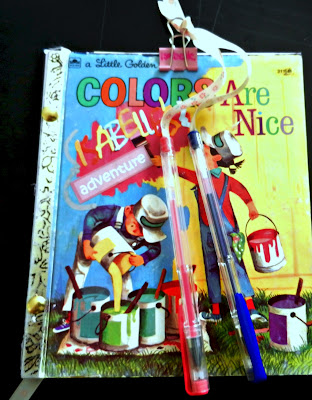
So they'd always have a pen at hand, I attached a couple of pens to ribbon, which I tied onto a bulldog clip. This just clips to the journal and has the bonus purpose of making sure things dont fall out!

I wanted these to be a special gift and easy to use while travelling so I also purchased these cheap pencil cases that I made pretty, because they weren't. I included some pencils and stickers that they could use in their journals as well. Now they're easy to keep track of in luggage and easy to yank out should boredom strike!
Now I can't wait for them to get home so I can see all the amazing things they've done!
Some notes:
Separating the books is fiddly because I wanted to preserve the golden binding tape. It is so identifiably Little Golden Book and I have always loved it. It would be simpler if you just ripped the binding tape off so you can access the staples easily and then replaced the tape with washi tape once the covers were separated.
Also if I was to make this project again I would use sturdier paper. I would still want it to go through the printer, but it needs to be a bit tougher so it doesn't tear where the holes are punched for the screws. I know I'm going to have to do some repairs when the girls get back!
This is a fantastic idea. In the past I've had my son create a travel 'journal' when we have been away, but it was only ever a scrapbook, nothing nearly as nice as this.
ReplyDeleteThey have really enjoyed them it was a fantastic idea and a very thoughtful gift. Thankyou.
ReplyDeleteLove , love , love them !
ReplyDeleteWhat an awesome idea! Love it!!! Great tutorial... thanks so much for sharing :)
ReplyDeleteSuch a wonderful idea and your instructions and photos make it a delight to read. Might have to give it a go. Thank you <3
ReplyDeleteLove Little Golden Books! Good job on the upcycling! Ive also seen them bound with one of those Bind-it-all machines - lets the book sit flat when open.
ReplyDeleteThis is wonderful! I make coasters out of vintage storybooks so I have a storybook cover graveyard! They're too pretty to throw away. I'll make journals for myself and little ones now! Perfect xx
ReplyDelete